Rear bumper repair
Toyota Auris various chips/scratches to
rear bumper
This bumper had been scuffed in several area's, most of the
scuffs were fairly minor, however they covered more or less
the whole bumper, resulting in a full bumper respray. Total
repair time was just was just over 2 hours at a cost of
£165.00 + vat.

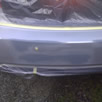
Before
Although not really visible in these photographs there
were numerous small chips/scuffs along the whole of the
rear bumper.

Step 1
The scuffs are all sanded to a smooth finish and filled
if necessary.

Step 2
Damaged areas are now sprayed with primer and dried
under infrared lamps.
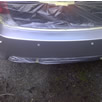
Step 3
More of the primed area's, now the bumper is ready for
spaying silver.
Step 4
Once the colour code is obtained from the car, the
paint is mixed on site and sprayed to cover the primed
areas.
Step 5
Finally we spray 2 coats of clear lacquer to give a
mirror shine finish, and bake off under infrared lamps..

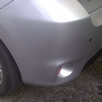
After
After just over 2 hours the bumper is as good as new.


